| |||||||||||||
| | |||||||||||||
| Copyright 2010 Katherine E Maguire |
Rabu, 27 Oktober 2010
Composition


White Balance and Colour Temperature.
The light that falls on your subject in the morning is not the same as the light at midday and that light will depend on the weather conditions. The colour temperature of light is measured in degrees Kelvin and can range from cool to warm casts of white light where candle light has a temperature of approximate 1900, tungsten photographic lights 3200, and overcast sky 6000. The human eyes are capable of adjusting to changes in colour temperature. The following table below gives the approximate colour temperature for different lighting conditions / times of day
| Blue sky | 9000 - 1200 |
| Shade from blue sky | 7500 |
| Shade from party cloudy sky | 7000 |
| Shade from daylight | 6500 |
| Overcast sky | 6000 |
| Sunlight (noon, summer, mid-latitudes) | 5500 |
| Electronic photo flash | 5500 - 5600 |
| Sunlight (early morning and late afternoon) | 4500 |
| Hour from dusk/dawn | 3500 |
| Professional tungsten photographic lights | 3200 |
| Sunlight (sunrise or sunset) | 2000 |
For film photography, the photographer would use special film for different lighting conditions, or filters in front of the lens when shooting in mixed lighting conditions on the same roll of film. In digital photography you take colour temperature in account by setting the white balance control of the digital camera.
Most cameras have an automatic white balance setting (AWB), although this does not guarantee that the image produced will have the correct white balance, as the camera has to determine the colour temperature from the light reflected and not the light falling on the subject. The images that AWB produces can have a blue, red or green tint and thus unrealistic.
On DSLR camera’s, you can manually set the white balance, these settings are normally, | Shade | | preset approx 7000 K |
| Flash | | |
| Cloudy | | preset approx 6000 K |
| Daylight | | preset approx 5200 K |
| White fluorescent light | | preset approx 4000 K |
| Tungsten | | preset approx 3200 K |
| Kelvin | | Allows you set the colour temperature to be used. |
| Custom | | Allows you to calibrate the the white balance for the lighting conditions by taking a image of gray reference. |
Remember that the presets are only estimates for ideal lighting conditions. As mention above the light varies depending on the time of day and your attitude above sea level, therefore you need to interpret which preset is more suitable to your lighting conditions. You can use the LCD screen to judge whether the image is too cool or warm although the LCD can also be misleading. Adjusting the preset up or down and re-shoot. For cool shots you need to change the setting by choosing one that is above (in the table above, excluding the custom and Kelvin setting) your current setting and vice versa if your image is too warm. It is good practice to bracket your white balance settings if you think that the image on the LCD screen has an incorrect colour cast. If this is not successful then you can use the Kelvin setting to input a temperature.
Another technique is to use the camera custom setting and a neutral reference to determine the correct colour temperature for your lighting conditions. A neutral reference can be a white or gray card that you take a image of when the camera’s White Balance is set to auto, the card must fill the frame. Then via the menu select Custom WB and choose the image that you want to base the white balance on. Thus every time you set the White balance of your camera to Custom, the camera will applied the colour temperature of the reference image as the white balance. Remember that you will have re-shoot the reference image when the lighting conditions change.
When you import the image onto the your computer, you can check whether the white balance is correct and if necessary change it using photo editing software. To get the best results using editing software then it better that you shot in RAW, as makes it easier for you to adjust the white balance of the image. One method that you can use, is to use the white balance dropper that allows you to pick a neutral point on your image as reference point and the software will adjust the image according.
The Crop Factor
A lens will always project a circular image onto the back of the camera, the recording media will capture the image as a smaller rectangle inside this circle. If the edges of the rectangle extends to the circumstance of the circle then the camera is considered to have captured full frame. This is the case for 35 mm cameras, but most digital sensors used in DSLRs cameras will capture a smaller rectangle as the sensors are smaller than 35 mm negative film. Thus the smaller sensor of the digital camera produces a reduced field of view.
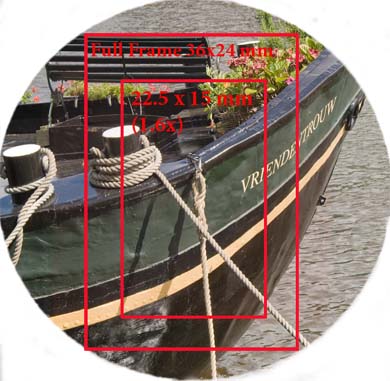 | The crop factor is the diagonal of 35 mm film divided by diagonal of the sensor. The crop factor is also known as the Focal Length Multiplier (FLM) as when you multiple the focal length of the lens with the crop factor, you will give the equivalent focal length that you would need, to produce the same image on a full frame camera. This crop factor means that the focal lengths marked on all lens will have to be multiplied the FLM for the sensor to get the field of view. That is on a Canon 40D using a EF-S lens at 17 mm, the image taken will have the field of view as an image taken with a Canon 5D using a EF lens at 28 mm. The actual focal length of the lens does not change, as this is determined by the physical construction of the lens optics. It is not true that you need a crop factor for all DSLRs as there are now many full frame DSLRs on the market, like the Canon 5D, and 1Ds ( The Canon ID has a crop factor of 1.3). |
Should the Photographer be concerned about the Crop Factor.
Should a photographer using a small sized sensor be concerned about the crop factor, well there are a number of points to remember,- Depth of is actually greater when compared to the image that would have be produced by a lens of the equivalent focal length taken by a full frame camera. This is because real focal length of the lens does not change and is lens construction that effects the depth of field.
- Prospective, attaching a lens designed for full frame may caused the photographer to move further away from the subject, thus effecting prospective. But when the photographer does not move the prospective is unchanged.
- Camera shake, the old rule for camera shake is no longer valid, if your lens has a focal length of 50 mm, then under the camera shake rule you would need a shutter speed of faster than 1\50, to avoid camera shake for hand held cameras. But to avoid camera shake, the equivalent focal length needs to used and thus for 50 mm, the equivalent focal length is 50 x 1.6 = 80 mm, therefore you need a shutter speed faster than 1/80.
- For lens that are not designed for the smaller sensors, the crop will remove the soft edges produced by your lens as all lens are sharper in the center than at the edges.
- There are special lens that are produced for the smaller sensor, for canon the EF-S series are one such set of lenses. The lens are closer to the sensor than lens designed for Full Frame cameras and thus cannot be used on Full Frame Cameras. As these lens produce a smaller circle thus if they were used on a Full Frame camera you would see black edges around the image. Also as the end of the lens is closer to the sensor, there is a danger that the mirror will hit the lens on a Full Frame Camera.
The Histogram
The histogram is one of the Photographer most important tools, and is under used by many Photographers. All DSLR and most digital point and shoot cameras have the ability to display both the image and Histogram on the camera’s LCD screen.
After each shot, I will examine the histogram to discover whether the image contains a good range of tonal values. The brightness levels for every pixel in the image are recorded, for a 8 bit this level can range from 0 to 255. (0 is absolute black and 255 is absolute white) The horizontal axis of the histogram represents the brightness level and thus has values of 0 to 255. The vertical axis of the histogram represents the number of pixels that have one particular value.
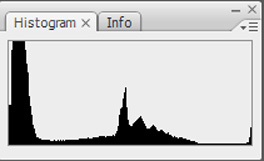
The image and it’s histogram below displays a good range of tones. You can see that the majority of the pixels are close to the center of the histogram.

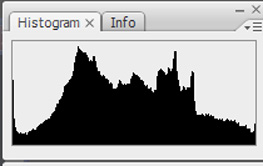
A light meter, records for mid tones which has a numeric value of 128, the reading will be an average of all the areas of the image that camera considers important. (How theses areas are determined are dependent on the meter setting that you have selected, i.e. spot, center weighed etc). If there are more dark or light areas in the image the camera may under or over expose these areas respectively. This means that a dark image will have many pixels with brightness levels that are close to 0 and that a light image will have many pixels with brightness levels that are close to 255. The edges (about 5 pixels) should not be taken into consideration when you are analyzing the image. As these are at the edge of the sensor dynamic range. The distribution of the pixels is a complex subject which has been simplified for clarity.
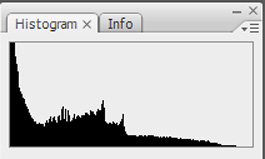

Determining whether the image has a good range of brightness levels, is where the Histogram comes in. It is a simple graph where you can see brightness levels from the darkest to the lightest. You can clearly see from the histogram whether the majority of pixels are too far to left or to the right. The image above and its histogram illustrates that there are large areas that are too dark.
As you can see from the image that is associated with this histogram that contains large dark areas. The sky is very dark, so is the water, there is no detail in the shadows. When you viewed this image on the LCD of the camera, you can determine whether you need to adjust the exposure and re-shoot if necessary. Viewing the image on the LCD alone will not give you this information, which is why you always need to view the histogram.
When the graph is too far to the right, then the image will have too many bright areas, as shown in the image below.
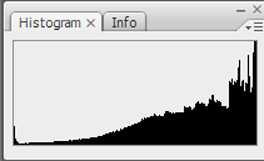
When there a lot of pixels on the right, then the highlights are blown out and the image may be overexposed. When there are a lot of pixels to the left, there are loss of detail in the shadow and the image may be underexposed. Note that I say may be, this determination depends on what your are photographing (More on this latter).
So what can you do to correct an image that is either under or over exposed. Underexposure.
- Use the cameras exposure compensation to shift the histogram to the right. This is available in Program AE, Av and Tv modes, you can set a positive exposure compensation in +1/3EV steps.
- In Manual mode, set the shutter speed slower, while retaining the same aperture. ie if your settings are 1/125 and f8 reduce the shutter speed to 1/100.
- In Manual mode, set the aperture wider, while retaining the same shutter speed. ie if your settings are 1/125 and f8, open the aperture to f5.6
Overexposure.
- Use the cameras exposure compensation to shift the histogram to the left. This is available in Program AE, Av and Tv modes, you can set a negative exposure compensation in -1/3EV steps.
- In Manual mode, set the shutter speed faster, while retaining the same aperture. ie if your settings are 1/125 and f8 reduce the shutter speed to 1/150.
- In Manual mode, set the aperture smaller, while retaining the same shutter speed. ie if your settings are 1/125 and f8, close the aperture to f12.
Bad or Good histograms
The histogram is only a guide to help you take better pictures, there is no such thing as a correct histogram. It is only a indication that an image is either under or over exposed. As an image that contains large number of dark or light pixel might be just what you wanted.
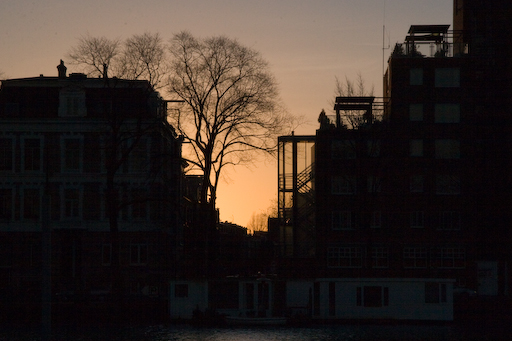
Examples of this are silhouettes which will contain large areas of dark pixels, or images of snow which will contain a lot bright pixels.The picture of the silhouette and it’s histogram below shows a lot there are a lot of dark pixels and thus for type of image that I was trying to produce is correctly exposed.
The picture of the snowman and it’s histogram below shows a lot there are a lot of bright pixels and thus for type of image that I was trying to produce is correctly exposed.


Some handy tips for digital Black and white Photography
|
Home Admin Finally, Some Classes Again
We’ve taken a hiatus from teaching photography classes due to the move of our studio and the busy summer months, but now we have begun offering them again. We’ve started with some Beginning Photography classes in late August and Early September and will begin the Intermediate classes in late September. Also, the Photoshop, and PS Elements classes will begin again in September. Stay tuned!
To check them out,
click here.
1- Turn off your flash!!!
To check them out,
click here.
Here’s a post that anyone can find useful. Use these tips to take your own better pictures.
I went on KSL’s daytime program Studio5 to talk about the tips:
1- Turn off your flash!!!
a. Flash kills the mood of any scene. It makes everything flat, one dimensional and boring. I only use a flash when absolutely necessary, such as at night or in a very dark room.
b. Natural light enhances people, surroundings, objects, etc. It is part of the story. Whenever possible, leave it alone!
2- Look for good light first, then background
a. A common mistake people make it that they will see a background that they like, and then struggle with making the people look good in the existing light.
b. A better approach is to find good light (which is easy to do) and then find a background within that light.
c. Backlight! Place your subject so the sun is behind them. Just remember not to let the sunlight hit your camera lens.
d. The background is not nearly as important as your subject.
3- Careful composition
a. Subject placement can make a huge difference in the look of a photograph. I very seldom center a full body shot of anyone. There are two ways to compose for the most impact… using the rule of thirds or placing your subject in one of four quadrants of the frame.
b. Whatever the most important part of the image is should be placed in one of these locations. (Eyes, face, feet, hands, etc…)
c. Don’t be afraid to turn your camera sideways. Too many times, people hold the camera horizontally because it is more comfortable. Try shooting on a diagonal
4- Get closer to your subject
a. Extreme close-ups of babies and kids are great. Fill the frame with whatever the subject is. If it is a flower, fill the frame with the flower.
b. Some cameras have limitations on how close they can get, so be aware of these and get as close as you can.
5- Change your perspective
a. Don’t always stand and look at your subjects from your normal vantage point. It is so much more interesting to stand above something or below something or someone, or even behind!
b. Place your subject where you think you want them, shoot a few pictures, and then walk around them to see if there is anything interesting from a different perspective.
6- Let Kids be Kids!
a. Sometimes we get so caught up in getting that perfect posed image. The best images are usually the ones of the kids just being themselves. Let them have fun and be crazy, and the pictures will show that.
Feel free to post any questions, or ask me any questions that you might have!
Well here it is. We’ve had many requests and are finally doing it. We are going to offer photography classes!
We have tried to make them accessible for everyone, by including a daytime class (for mom’s with kids in school) and a weekend class, for those who work during the week. If a better time would work for you, let us know and we will consider it. Hopefully these times will work for most people’s schedule.
I have heard people say that they just don’t want to mess with all the settings…they’d rather just shoot with freedom. But, I’m telling you…that saying is true, knowledge is power. It is more freeing to know that you will be able to nail your shot no matter what the circumstances than hope the camera got it how you wanted.
How do I work this camera? How do I get the background blurry so my subject POPS out of the image? How can I create an image how I WANT IT, rather than how my camera automatically chooses? How can I create great pictures that interesting to look at and not just “snapshots?” There are tricks to know and once you learn them they will help you shoot anything you like and bring your vision to life. Don’t be scared of your camera!
This class is centered on the basics that will help you become a better photographer. We want you to leave this class feeling confident, that you have the tools to take better pictures. We will cover the basics so that you feel comfortable working with your camera, comfortable shooting in various lighting situations, and knowledge of the different compositional elements that make a picture great!
What we will cover in the class:
Functions of a camera: -aperture/F-stop, shutter speeds, white balance, ISO, image quality and file size, camera modes, lenses, and bracketing.
Compositional rules: -the rule of thirds, quadrants, and compositional elements, and some ideas for simple posing of people.
Basics of lighting: -soft vs. hard light, direction of light, natural light, shooting with light indoors, and flash lighting.
Classes included a total of 6 hours of training and a booklet that includes the information we have covered, photographic images that illustrate the topics we go over, and a place for your notes. We spread the class over two days, with a 3-hour class on each day.
The classes will be taught by Kelly Anne and are offered:
Weekend Beginning Photography Class: February 27 (Fri.) from 6pm-8pm and February 28 (Sat.) from 10am-2pm. •••SOLD OUT!!!•••
Morning Beginning Photography Class: March 10th (Tues.) from 10am-1pm and March 11 (Wed.) from 10am-1pm.
Morning Beginning Photography Class: April 14 (Tues.) from 10am-1pm and April 15 (Wed.) from 10am-1pm.
Weekend Beginning Photography Class: April 24 (Fri.) from 6pm-8pm and April 25th (Sat.) from 10am-2pm.
What you need to bring to class: Bring a pen or pencil to write with, and bring your camera! It would be best if you have a D-SLR camera (one where you can swap lenses), but a point-and-shoot camera would work as long as it has full manual settings. If it doesn’t, you may want to upgrade you camera before taking the class.
Click below to register for the class, or if it is a gift, stop into the studio for a class certificate in a cute box suitable for giving as a gift.
http://www.galleryphotography.com/pickpic3/shop/viewpublicproducts.php
If you have any other questions about the class, e-mail me: kellydavid@galleryphotography.com
Questions to ask yourself to determine if you are ready for the intermediate class:
1) Do I know what the aperture and shutter speed of a camera are and do I have a basic knowledge
of how to use them?
2) Do I know what white balance is, and how to use it?
3) Do I know what ISO is, and how it affects my pictures?
4) Am I familiar with the different camera modes my camera offers
5) Am I familiar with compositional rules, such as the rule of thirds, shooting in quadrants, leading
lines, etc…?
If you can answer yes to these questions, you are ready for the intermediate class. If you are unsure, please, please, please, take the beginning photography class first. You will thank yourself later (and other students won’t have to wait for you to catch-up).
What we will cover in the class:
Functions of a camera: -shooting JPEG vs. RAW, intermediate aperture/F-stop usage, intermediate shutter speed usage, knowing your white balance and using tools to get it perfect, intermediate use of camera modes, and discussing different lens for different situations. Also discussing the perspective lenses bring.
Compositional rules: -strong emphasis on leading lines, textures, and negative space in imagery. Focus on a sense of confidence shooting ANYWHERE. Discussing posing of individual in spaces as well a groupings of people.
Basics of lighting: -finding and using soft vs. hard light and creating depth and dimension with the direction of light. Exploiting natural light, and finding the good light even at noon. Finding great light indoors, mixing both ambient and flash light, and exploring the color of light. Also using flash, both on and off camera.
Classes included a total of 6 hours of training and a booklet that includes the information we have covered, photographic images that illustrate the topics we go over, and a place for your notes. We spread the class over two days, with 3-hour classes on each day.
The classes will be taught by Kelly David Sansom and are offered:
Weekend Intermediate Photography Class: February 20 (Fri.) from 6pm-8pm and February 21 (Sat.) from 10am-2pm.
Morning Intermediate Photography Class: April 7 (Tues.) from 10am-1pm and April 8 (Wed.) from 10am-1pm.
What you need to bring to class: Bring a pen or pencil to write with, and bring your camera! You will need a D-SLR camera for this class. If you don’t have one, you may want to upgrade you camera before taking the class. Also, bring your lenses and flashes and we can discuss them.
Click below to register for the class, or if it is a gift, stop into the studio for a class certificate in a cute box suitable for giving as a gift.
http://www.galleryphotography.com/pickpic3/shop/viewpublicproducts.php
If you have any other questions about the class, e-mail me: kellydavid@galleryphotography.com
What we will cover in the class:
We will cover cropping, and vignettes to focus in on your subject. We will learn how to add contrast and saturate colors to make your images more dynamic. And we will teach you how to do simple retouching of blemishes, remove small objects you want removed, and simple eye swaps and mouth swaps.
Classes included a total of 3 hours of training and a booklet that includes the information we have covered, photographic images that illustrate the topics we go over, and a place for your notes.
PHOTOSHOP ELEMENTS CLASS
The classes will be taught by Kelly David Sansom and Mark Evans and are offered:
Morning Beginning Photoshop Elements Class: March 4 (Wed.) from 10am-1pm.Morning Beginning Photoshop Elements Class: April 22 (Wed.) from 10am-1pm.
Be aware that Photoshop and Photoshop Elements are different types of software. Make sure to sign up for the class that teaches the software you currently own.
PHOTOSHOP CLASS
The classes will be taught by Kelly David Sansom and Mark Evans and are offered:Morning Beginning Photoshop Class: March 3 (Tues.) from 10am-1pm.Morning Beginning Photoshop Class: April 21 (Tues.) from 10am-1pm.
What you need to bring to class: Bring a pen or pencil to write with, and if possible bring a laptop with the specific software loaded. If you don’t have either of these pieces of software, look into purchasing one before taking the class. Also bring a couple images for us to discuss and to work on.
Click below to register for the class, or if it is a gift, stop into the studio for a class certificate in a cute box suitable for giving as a gift.
http://www.galleryphotography.com/pickpic3/shop/viewpublicproducts.php
If you have any other questions about the class, e-mail me: kellydavid@galleryphotography.com
We have tried to make them accessible for everyone, by including a daytime class (for mom’s with kids in school) and a weekend class, for those who work during the week. If a better time would work for you, let us know and we will consider it. Hopefully these times will work for most people’s schedule.
Beginning Photography Class $125
Have you ever wanted to take better images of your kids, or when you travel? Wouldn’t it be great to decorate your home with your own images from your travels, instead of someone else’s? Ever thought you captured a special moment with your camera, only to find out later, it isn’t at all what you saw with your eyes? I think everyone has felt this way.I have heard people say that they just don’t want to mess with all the settings…they’d rather just shoot with freedom. But, I’m telling you…that saying is true, knowledge is power. It is more freeing to know that you will be able to nail your shot no matter what the circumstances than hope the camera got it how you wanted.
How do I work this camera? How do I get the background blurry so my subject POPS out of the image? How can I create an image how I WANT IT, rather than how my camera automatically chooses? How can I create great pictures that interesting to look at and not just “snapshots?” There are tricks to know and once you learn them they will help you shoot anything you like and bring your vision to life. Don’t be scared of your camera!
This class is centered on the basics that will help you become a better photographer. We want you to leave this class feeling confident, that you have the tools to take better pictures. We will cover the basics so that you feel comfortable working with your camera, comfortable shooting in various lighting situations, and knowledge of the different compositional elements that make a picture great!
What we will cover in the class:
Functions of a camera: -aperture/F-stop, shutter speeds, white balance, ISO, image quality and file size, camera modes, lenses, and bracketing.
Compositional rules: -the rule of thirds, quadrants, and compositional elements, and some ideas for simple posing of people.
Basics of lighting: -soft vs. hard light, direction of light, natural light, shooting with light indoors, and flash lighting.
Classes included a total of 6 hours of training and a booklet that includes the information we have covered, photographic images that illustrate the topics we go over, and a place for your notes. We spread the class over two days, with a 3-hour class on each day.
The classes will be taught by Kelly Anne and are offered:
Weekend Beginning Photography Class: February 27 (Fri.) from 6pm-8pm and February 28 (Sat.) from 10am-2pm. •••SOLD OUT!!!•••
Morning Beginning Photography Class: March 10th (Tues.) from 10am-1pm and March 11 (Wed.) from 10am-1pm.
Morning Beginning Photography Class: April 14 (Tues.) from 10am-1pm and April 15 (Wed.) from 10am-1pm.
Weekend Beginning Photography Class: April 24 (Fri.) from 6pm-8pm and April 25th (Sat.) from 10am-2pm.
What you need to bring to class: Bring a pen or pencil to write with, and bring your camera! It would be best if you have a D-SLR camera (one where you can swap lenses), but a point-and-shoot camera would work as long as it has full manual settings. If it doesn’t, you may want to upgrade you camera before taking the class.
Click below to register for the class, or if it is a gift, stop into the studio for a class certificate in a cute box suitable for giving as a gift.
http://www.galleryphotography.com/pickpic3/shop/viewpublicproducts.php
If you have any other questions about the class, e-mail me: kellydavid@galleryphotography.com
Intermediate Photography Class $300
Do you want to take your photography to the next level? Do you feel you can take a good picture, but want to learn to take a great picture? Do you want to feel comfortable that you can get the image no matter what lighting situation you are in? Then this class is for you. This class is for those wanting to take their photography one step further.How do you know if you’re ready for the intermediate class?
I have posted some questions below to answer to see if you are ready. If you can answer these questions, you may truly be ready for the intermediate class. If not, please take the beginners class first. Nothing can be more frustrating than paying good money for a class and not getting anything out of it because it is too hard understand. The intermediate classes are purposely scheduled later in the month, so that you can take the beginners class first if needed!Questions to ask yourself to determine if you are ready for the intermediate class:
1) Do I know what the aperture and shutter speed of a camera are and do I have a basic knowledge
of how to use them?
2) Do I know what white balance is, and how to use it?
3) Do I know what ISO is, and how it affects my pictures?
4) Am I familiar with the different camera modes my camera offers
5) Am I familiar with compositional rules, such as the rule of thirds, shooting in quadrants, leading
lines, etc…?
If you can answer yes to these questions, you are ready for the intermediate class. If you are unsure, please, please, please, take the beginning photography class first. You will thank yourself later (and other students won’t have to wait for you to catch-up).
What we will cover in the class:
Functions of a camera: -shooting JPEG vs. RAW, intermediate aperture/F-stop usage, intermediate shutter speed usage, knowing your white balance and using tools to get it perfect, intermediate use of camera modes, and discussing different lens for different situations. Also discussing the perspective lenses bring.
Compositional rules: -strong emphasis on leading lines, textures, and negative space in imagery. Focus on a sense of confidence shooting ANYWHERE. Discussing posing of individual in spaces as well a groupings of people.
Basics of lighting: -finding and using soft vs. hard light and creating depth and dimension with the direction of light. Exploiting natural light, and finding the good light even at noon. Finding great light indoors, mixing both ambient and flash light, and exploring the color of light. Also using flash, both on and off camera.
Classes included a total of 6 hours of training and a booklet that includes the information we have covered, photographic images that illustrate the topics we go over, and a place for your notes. We spread the class over two days, with 3-hour classes on each day.
The classes will be taught by Kelly David Sansom and are offered:
Weekend Intermediate Photography Class: February 20 (Fri.) from 6pm-8pm and February 21 (Sat.) from 10am-2pm.
Morning Intermediate Photography Class: April 7 (Tues.) from 10am-1pm and April 8 (Wed.) from 10am-1pm.
What you need to bring to class: Bring a pen or pencil to write with, and bring your camera! You will need a D-SLR camera for this class. If you don’t have one, you may want to upgrade you camera before taking the class. Also, bring your lenses and flashes and we can discuss them.
Click below to register for the class, or if it is a gift, stop into the studio for a class certificate in a cute box suitable for giving as a gift.
http://www.galleryphotography.com/pickpic3/shop/viewpublicproducts.php
If you have any other questions about the class, e-mail me: kellydavid@galleryphotography.com
Beginning Photoshop Elements Class $100ea.
These are classes that so many people could benefit from! Digital files from digital cameras are inherently flat and muddy. We will teach everyone how to polish up their images in easy to follow steps that make them look snappy and awesome! These classes are all about taking an otherwise pretty good shot, and making it a really good shot. This We will NOT get technical. These classes are meant to instruct the everyday person on how to do the specific things they want to do to their images in Photoshop or Photoshop Elements.What we will cover in the class:
We will cover cropping, and vignettes to focus in on your subject. We will learn how to add contrast and saturate colors to make your images more dynamic. And we will teach you how to do simple retouching of blemishes, remove small objects you want removed, and simple eye swaps and mouth swaps.
Classes included a total of 3 hours of training and a booklet that includes the information we have covered, photographic images that illustrate the topics we go over, and a place for your notes.
PHOTOSHOP ELEMENTS CLASS
The classes will be taught by Kelly David Sansom and Mark Evans and are offered:
Morning Beginning Photoshop Elements Class: March 4 (Wed.) from 10am-1pm.Morning Beginning Photoshop Elements Class: April 22 (Wed.) from 10am-1pm.
Be aware that Photoshop and Photoshop Elements are different types of software. Make sure to sign up for the class that teaches the software you currently own.
PHOTOSHOP CLASS
The classes will be taught by Kelly David Sansom and Mark Evans and are offered:Morning Beginning Photoshop Class: March 3 (Tues.) from 10am-1pm.Morning Beginning Photoshop Class: April 21 (Tues.) from 10am-1pm.
What you need to bring to class: Bring a pen or pencil to write with, and if possible bring a laptop with the specific software loaded. If you don’t have either of these pieces of software, look into purchasing one before taking the class. Also bring a couple images for us to discuss and to work on.
Click below to register for the class, or if it is a gift, stop into the studio for a class certificate in a cute box suitable for giving as a gift.
http://www.galleryphotography.com/pickpic3/shop/viewpublicproducts.php
If you have any other questions about the class, e-mail me: kellydavid@galleryphotography.com
Kamis, 21 Oktober 2010
30 Photography Magazines Worth Subscribing To
As both free and premium online content grows in popularity, the world’s love of printed magazines has declined dramatically. Consequently, it becomes harder and harder for fans of print to find quality sources of information on their favorite subjects.
Today we bring you thirty bonafide printed photography magazines from around the world that you can still subscribe to today. They range dramatically in price, frequency and content focus to appeal to photographers from all across the talent spectrum!
Before we get started, it’s worth noting that these prices are these are the best estimates we could find. Subscription costs vary dramatically depending upon what country you’re in, so it’s worth checking with your local magazine shop or newsagent!
Popular Photography
“Ready to take better pictures? Want to buy smart, when it comes to digital and film cameras, lenses, printers, and other essential gear? Popular Photography & Imaging is packed with great photos, how-to tips, lab tests of the latest equipment, and expert advice on getting the most out of every shot.”

Outdoor Photographer
“Outdoor Photographer contains practical information and tips regarding photographing nature, wildlife, sports, and landscape. Regular columns cover developments in 35mm and digital photography, camera accessories, film, lenses, outdoor gear and apparel, travel, ecological concerns, and workshops. Much of the information is highly technical, with discussions of lighting, exposure, filters, setup, and the right gear to take on location. Every issue also contains travel articles and a “Favorite Places” column that details great spots for outdoor photography, including how to get there, what to take, and the best times to visit.”

Shutterbug
“Shutterbug is a photo magazine for advance amateur and professional photographers. Sections include techniques features, equipment reviews, electronic imaging and video, classic collectibles, plus darkroom articles and Help!, a question and answer column.”

Practical Photography
“Practical Photography magazine is the perfect read for anyone wanting to get more from their Digital SLR. It teaches you all the camera skills you need, inspires creativity, and keeps you informed of the latest photo gear launches. It’s ideal for anyone who is passionate about taking better photographs.”

Black & White Magazine
“Black and white photography magazine. Includes developments in photography, an opening shot, information on the market scene, a visual section, the printed page section, special features, photographer spotlights, positive and negative section, exposure section, book reviews, and a closing shot.”

Black & White Photography
“Black & White Photography strikes a balance between inspiration and information, traditional and digital for the monochrome photographer. Each issue features stunning images from some of the finest names in black & white; regular features include guidance on printing technique, equipment tests and reportage, with plenty of opportunity for readers to see their own work in print.”

British Journal of Photography
“The British Journal of Photography contains features, profiles, equipment reviews, classifieds, a discussion forum, technical tips, and, of course, lots of photographs.”

Digital Photography & Design
“This is a specialist quarterly publication dedicated to the rapidly expanding world of electronic imaging, manipulation and design. Each issue highlights the world of professionals in both high-end commercial applications as well as the burgeoning consumer market.”

Outdoor Photography
“Outdoor photography magazine is dedicated to those who gain inspiration and pleasure from the British countryside and wildlife. The magazine is full of BIG photography, informative and reliable articles and exclusive opportunities for your participation and involvement.”

Better Photography – India
“Better Photography is an Indian magazine completely devoted to the art and science of photography. It features interviews, critiques, technical tips, instruction, and in-depth reviews”

American Photo
“This magazine is for men and women interested in creative photography. It profiles the personalities behind the lens and their contributions to art, history, fashion, journalism, and advertising. American Photo often features reviews of exhibitions and books, readers’ photos and requests and picture portfolios and stories on working professionals.”

Aperture
“Aperture Magazine has been described by leading professionals as “the most serious and the most valuable periodical in the photographic world” and “a permanent testimonial to the great photographers of our time” and “essential for anyone who takes photography seriously.” The printing and binding are of exceptional quality and the paper is extra heavy coated stock.”

Digital SLR Photography
“The UK’s biggest photography magazine, providing you with the very best techniques, advice and images from the photo world.”

Digital Photographer
“Aimed at digital enthusiasts and professional photographers, Digital Photographer features the latest high-end kit reviews, expert interviews, practical shooting advice and image-editing tutorials to help you become a better photographer. We also showcase a selection of images from DP readers every month – the ideal launch pad for your career.”

I-MAG PHOTOGRAPHY
“Philippines’ No. 1 magazine on the art and craft of photography. For those who want to know more about photography and photographers, I-MAG PHOTOGRAPHY delivers.”

Professional Photographer
“Professional Photographer is filled with the essential tools pro shooters like you need to succeed. Our business and marketing articles will help you manage your business efficiently and effectively. Product and technology reviews keep you up-to-date on the latest equipment, and the image-based profiles and features will inspire you to new heights.”

Focus Magazine
“Focus Magazine is the world’s premiere magazine for collecting fine art photography. No other magazine offers more content, more interviews, more in-depth information and more galleries announcing their latest exhibitions.”

Nature’s Best Photography
“Nature’s Best Photography print magazine is a large-format, award-winning, showcase of nature as recorded by the world’s leading professional photographers, naturalists, adventurers, as well as new, emerging photographers. You will find images and the stories behind the shots on topics such as: wildlife, landscapes, plant life, travel, how-to photo tips, inspirational essays, and winners from our international photography competitions!”

Photo Technique
“With full respect for the photographic history and practices that have come before us, and dedicated to the vast array of exciting contemporary practitioners, we welcome you to a rejuvenated photo technique magazine. It is our philosophy that the photographic medium has never existed on the basis of unrelated techniques or unskilled aesthetics. For that reason, we incorporate the technology and methodology used in creating photographs into two categories. The first is a series of portfolio/article combinations that demonstrate both the means and the end result. The second is expanded technical articles intended to completely follow a process in detail, rather than offer short snip-its or tips.”

Amateur Photographer
“Amateur Photographer is the most authoritative and influential photographic magazine in the UK. With its unique weekly format, it is the first for news and equipment tests. Regular features on reader portfolios, darkroom, digital, black & white and photographer profiles ensure all areas of photography are covered. If you love photography you can’t afford to be without a weekly dose of AP inspiration.”

Digital Photo Pro
“The guide to advanced technology and creativity.”

Digital Photo
“You #1 guide for better digital photography.”

View Photography Magazine
“View photography magazine is a Belgian magazine, independent in its choices and editorial structure. The idea came a few years ago. And in 2005 the magazine was founded by Stephan De Broyer, the Chief Editor. Ever since View is a platform for contemporary photography but also an open door on cinema image creation, through which the reader discovers the different faces of the big screen and its protagonists.”

Foam magazine
“Foam Magazine serves as exhibition space that embraces every aspect of photography: from documentary to fashion, from contemporary to historical, from world-famous photographers to young talent. Each issue features a specific theme that unites 8 diverse portfolios of 16 pages. Each portfolio is printed on a different type of paper.”

D-Photo
“D-Photo delivers the latest news and reviews to New Zealand photographers, with in-depth and easy-to-use guides to help improve your shots. Featuring hints and tips from pros, inspiring spreads by the greatest photographers and prize-winning showcases of readers’ shots, D-Photo gives you the complete picture.”

Blind Spot
“Blind Spot is a triannual art journal that publishes unseen work by living photographers. In Blind Spot, images are given primacy and published collaboratively rather than curatorially, unaccompanied by introductory, biographical or explanatory text. Blind Spot is not about photography, our content is photography”

Nature Photographer
“Nature Photographer is a “how–to” magazine, published in print form three times a year covering all four seasons—Spring, Summer, Fall and Winter. The Spring issue is published each March, the Summer each July and the Fall/Winter a larger combo issue each November. The magazine is intended for nature photographers and nature enthusiasts who range from beginners to professionals. We will help you channel your intense interest in nature photography into more successful trips into the natural world, whether they be for the day, weekend, holidays or vacations. This is the magazine for those of you interested in photographing the wilderness—in far-off destinations, in local parks or in your own backyard.”
EOS Magazine
“If you have an EOS camera, whether you are a first-time buyer or an experienced user, we will help you master the camera controls and improve your pictures. Every 84-page issue of EOS magazine is packed with techniques, know-how, advice and inspirational images, all tailored to your EOS camera”

8 Magazine
“Produced Biannually, 8 Magazine brings you stories that challenge and inspire. See for yourself why 8 is regarded as the most exciting photojournalism and documentary photography publications today. Now in its eighth year of publishing, 8 Magazine represents the very best in photojournalism, writing, design and print, and follows a graphic format that uses the medium of the printed page to its fullest.”

Photography Monthly
“A strong photographic brand for 2009 and beyond, delivering targeted content using entertaining, informative and innovative editorial concepts. Consumers of both on and offline products choose Photography Monthly due to its consistent high quality editorial delivery, coherent message and lively approach, which always recognises and celebrates the reader’s enthusiasm for the subject.”

Conclusion
We hope this list will provide you with enough printed tutorials, reviews, inspiration and interviews to keep you flipping pages for years to come. Let us know in the comments below if you currently read any of the magazines above or any others dedicated to photography.
Also feel free to chime in on whether or not you think printed photography magazines have a hopeful future or will become more and more obscure in the years to come!
Langganan:
Postingan (Atom)